
This week we're sticking with composition so you can keep practicing the rule of the thirds while you think about these other things.
Faces. When shooting portraits and using the rule of thirds, you want your subject "moving into the frame." Especially if they are walking or looking away from the camera. Basically, this just means, you want the person to be facing the empty space in the portrait, not facing the edge of the portrait. A good way to visualize this is to imagine yourself in a box. If you were to stand in a box, you would automatically position yourself with your back to one side of the box and most of the empty space in front of you. In pictures, it often makes the viewer uncomfortable to see the subject facing the edge of the picture, or walking right out of it with all the empty space behind them. The other problem is the viewer of the image will follow the gaze or movement of the subject. If they're right on the edge of the photo, there is nowhere for the viewers eyes to go but off the picture, and you don't want that! You want to keep them looking at the picture! Here are some examples.
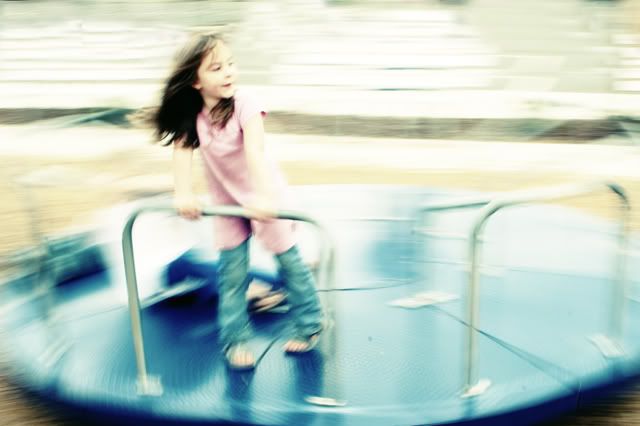
See how the movement is going towards the right of the image? And she's facing that way, but she's on the left? So your eye starts at Aria and follows the movement into the picture, then goes back to Aria. Make sense?
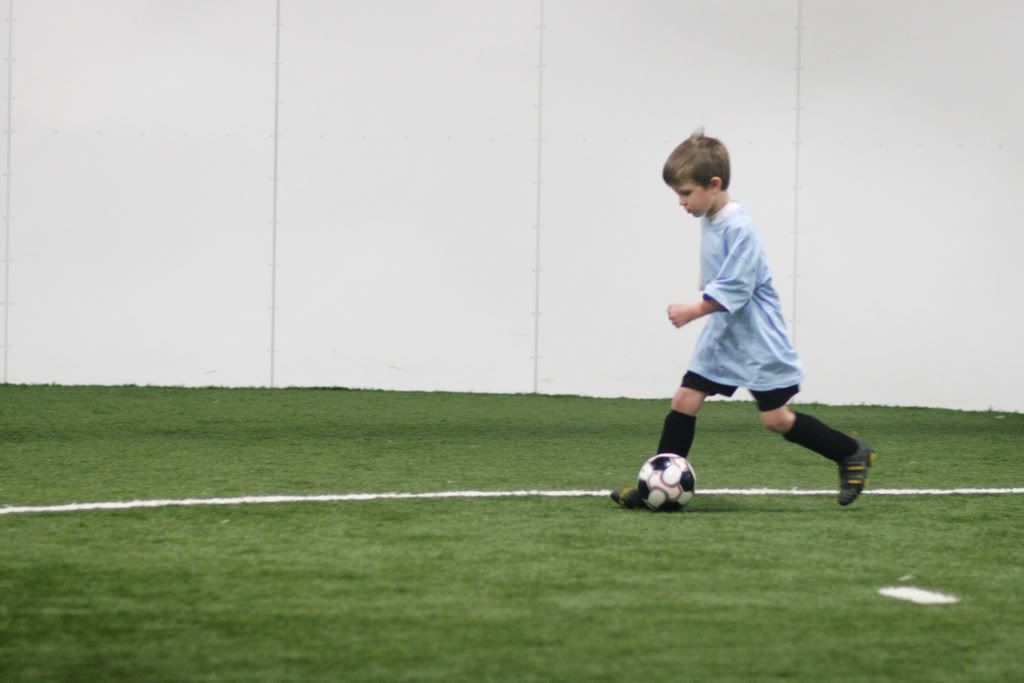
This one is more posed, but you can see how your eye stays inside the image because they're both facing in. Can you see how if I would have turned either one of them around to face the edge, your eye would follow them right out of the image?


A non-portrait example. This picture has 2 focal points, the front of the church with the door and cross where the light is falling and then the sign. If I had photographed the church by itself, it could stand alone if I kept it in the same general space, but had I moved the camera so that the door and cross were along the left side of the image and the whole right side was just the plain side of the church, it would lose a lot of it's impact.

I hope this is all making sense. Remember, rules can be broken, but it's best to learn to use the rule first, before you start experimenting with creating a good image while breaking the rules. (it can be done, but often it's because you're allowing a different rule to take precedence over the rule you're breaking. Like maybe the lighting...) Anyway, I'm getting ahead of myself.
Lines. Lines can be tricky in images because the viewers eye follows the line. If the line leads out of the image, you just lost your viewer. If the line leads to a focal point, you've created a good image.
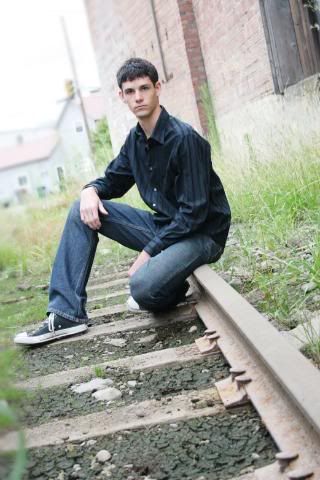
Here the line of the railroad track leads right to the main subject.
Because of the angle I chose on this one, the lines of the logs lead to the end of the log where your eye stops. Had I taken this picture with the logs going completely from one side of the image to the other, your eyes would follow the line right out of the image. Make sense?

Lines can also be used for framing. It's a bit different, but if you have a framing opportunity, use it! It keeps the eye right on the subject when you've framed them properly.
A couple framing examples.

Crop. Cropping is fairly simple. When you're doing a portrait that isn't a full length portrait you want to crop the person off in places that don't make the viewer uncomfortable. Basically, you want to avoid the joints. Cropping off just somebodies hands right at the wrist doesn't look that good. Same with feet at the ankles. Go for the forearm, calves, thighs or waist.
Mid-thigh crop example.
Don't be afraid to get in close. In fact, change your fear...be afraid to be back too far. When you're taking pictures of your kids, what do you want to see? Their face! Their eyes! Their expression! Get in there, people. Eliminate all that dead space in your images that's surrounding the thing you really want to see.
Getting in close.

Alright...let's see those images! Feel free to ask questions in the comments!
13 comments:
Hey I remember that moss log. Man I have so much homework to do.
Sorry I couldn't do the last lesson cuz I was out of town and had a hard time loading pics to other peoples computers.
But here are some photos for this lesson. I took them a few weeks ago. I'm not sure about the lines in a couple of them. Is it too distracting? I don't know. What do you think?
Photo 1
Photo 2
Photo 3
I think 1 and 3 are great. I like the lines in the first one. For some reason her shoes really distract me in the 2nd pic. I think it's because it's pretty wide angle so they look bigger than they should be.
Okay, I did it. Now don't flog me, I'm not sure I did it right.
Heidi, I like it! Because of the angle you used, the line of the bridge fades into the image instead of just going right out the side. And the parts that jut towards the top of the image catch your eye. I also like that you kept the main portion of the bridge in the bottom third. Good job! No flogging here!
Ooh! Thanks! Now that I look at it again you're totally right. Maybe I'll crop it and see if that helps.
I meant to link to this lesson, not the first. Did I do them right for this lesson?
Yup, you did, April. :) I was thinking that you had all the composition rules covered when I looked at them the first time but I didn't say anything cause I thought you were just doing Ro3. :)
I'm so excited about these lessons! I can't wait until you talk about lighting. I tried some things with buildings in Italy that I'm curious to see what you think.
How many of these lessons are there? I don't know if I can remember too much more than this!LOL I'll have to do this tomorrow and/or look at some photos I took today and see if I did this correctly!*S*
The pictures I took for your 2nd lesson are ready to be critiqued Misty. Thank you again! I believe (actually I know) that you have a gift/talent for photography. So thank you for sharing some of your knowledge and if improve just a tad that will help me be better that I began.
Alright Misty, if you aren't busy having a baby, I did lesson 2! :)
I'm uploading some pics right now. I wasn't completely clear on what you were looking for and I wasn't creative enough to really find lines. I don't have a car to search ;-)
My biggest obstacle was glasses and the glare.
Post a Comment